


No trader embraces the idea of getting stopped out for a loss…even though it absolutely is a part of trading. All traders, knowing they will have losses, want to minimize their losses as much as possible. Newer traders, however, to minimize their losses choose to set tight stops…in many cases verytight stops.
Setting a tight stop (the definition of a tight stop will vary depending on market conditions and the currency pair), may virtually assure that a trader will be stopped out of their position.
Currency pairs need room to move.
Over the course of time it is almost like they are breathing in and breathing out. If the stop is too tight, this movement, this breathing if you will, will be constricted and the stop will be triggered.
Let’s look at an example on this one hour chart of the AUDJPY…
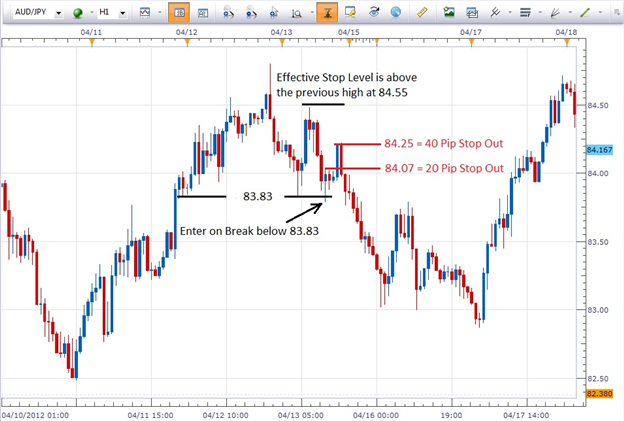
Since on the longer term chart this pair is in a downtrend, we know that we want to look for opportunities to short (sell) the pair. Such an opportunity presents itself when price breaks below support at 83.83. If we are a trader who simply places a tight stop based on a random number, let’s say 20 pips, we can see that depending on how price action took place during the time span of the candle that triggered the entry (black arrow), we could have been stopped out within the hour when the pair traded to 84.07.
Let’s say we gave the pair twice the room to move and placed our stop at 40 pips above our entry. We would have been stopped out three candles later when the pair traded up to 84.25. In each of the above instances we would have been stopped out before the pair makes a nice run to the downside for about 80 pips below our entry.
Rather than just selecting a number with which we are comfortable and using that for our stop placement, it is far better to place our stop based on the price action we see on the chart.
As we can see from the example, the effective stop level in this case was above the previous high at 84.55. Had we placed our stop there we would have remained in the trade through the retracement and been in position to gain pips as the pair moved strongly to the downside…the originally intended direction of our trade.
(In the case of going long (buying) a currency pair, the effective stop placement would be below a previous low.)
Bottom Line: As traders we want to place our stops where the pair is least likely to trade. This determination is best made by looking at a chart as opposed to selecting a random number of pips which has no relationship to price action and placing our stop based on that.